
Live HDR+ and Dual Exposure Controls on Pixel 4 and 4a
August 3, 2020
Posted by Jiawen Chen and Sam Hasinoff, Software Engineers, Google Research
High dynamic range (HDR) imaging is a method for capturing scenes with a wide range of brightness, from deep shadows to bright highlights. On Pixel phones, the engine behind HDR imaging is HDR+ burst photography, which involves capturing a rapid burst of deliberately underexposed images, combining them, and rendering them in a way that preserves detail across the range of tones. Until recently, one challenge with HDR+ was that it could not be computed in real time (i.e., at 30 frames per second), which prevented the viewfinder from matching the final result. For example, bright white skies in the viewfinder might appear blue in the HDR+ result.
Starting with Pixel 4 and 4a, we have improved the viewfinder using a machine-learning-based approximation to HDR+, which we call Live HDR+. This provides a real-time preview of the final result, making HDR imaging more predictable. We also created dual exposure controls, which generalize the classic “exposure compensation” slider into two controls for separately adjusting the rendition of shadows and highlights. Together, Live HDR+ and dual exposure controls provide HDR imaging with real-time creative control.
 |
| Live HDR+ on Pixel 4 and 4a helps the user compose their shot with a WYSIWYG viewfinder that closely resembles the final result. You can see individual images here. Photos courtesy of Florian Kainz. |
When the user presses the shutter in the Pixel camera app, it captures 3-15 underexposed images. These images are aligned and merged to reduce noise in the shadows, producing a 14-bit intermediate “linear RGB image” with pixel values proportional to the scene brightness. What gives HDR+ images their signature look is the "tone mapping" of this image, reducing the range to 8 bits and making it suitable for display.
Consider the backlit photo of a motorcyclist, below. While the linear RGB image contains detail in both the dark motorcycle and bright sky, the dynamic range is too high to see it. The simplest method to reveal more detail is to apply a “global curve”, remapping all pixels with a particular brightness to some new value. However, for an HDR scene with details in both shadows and highlights, no single curve is satisfactory.
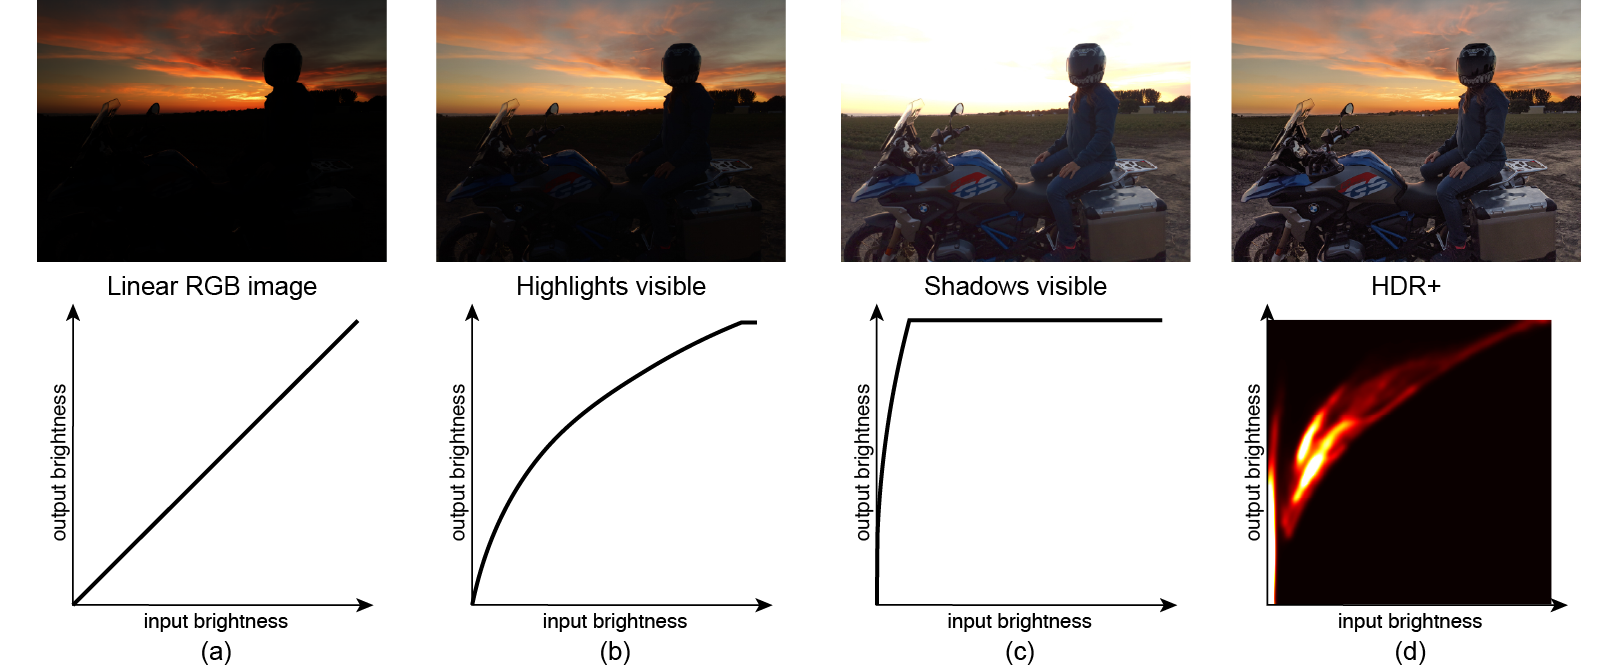 |
| Different ways to tone-map a linear RGB image. (a) The original, “un-tone-mapped” image. (b) Global curve optimizing for the sky. (c) Global curve optimizing for the subject. (d) HDR+, which preserves details everywhere. In the 2D histogram, brighter areas indicate where more pixels of a given input brightness are mapped to the same output. The overlapping shapes show that the relationship cannot be modeled using a single curve. Photo courtesy of Nicholas Wilson. |
Local Curve Approximation for Live HDR+
Using a single tone curve does not produce a satisfying result for the entire image — but how about for a small region? Consider the small red patch in the figure below. Although the patch includes both shadows and highlights, the relationship between input and output brightness follows a smooth curve. Furthermore, the curve varies gradually. For the blue patch, shifted ten pixels to the right, both the image content and curve are similar. But while the curve approximation works well for small patches, it breaks down for larger patches. For the larger yellow patch, the input/output relationship is more complicated, and not well approximated by a single curve.
 |
| (a) Input and HDR+ result. (b) The effect of HDR+ on a small patch (red) is approximately a smooth curve. (c) The relationship is nearly identical for the nearby blue patch. (d) However, if the patch is too big, a single curve will no longer provide a good fit. |
Compared to HDR+, this algorithm is particularly well suited for GPUs. Since the tone mapping of each pixel can be computed independently, the algorithm can also be parallelized. Moreover, the representation is memory-efficient: only a small number of tiles is enough to represent HDR+ local tone mapping for the viewfinder.
To compute local curves, we use a machine learning algorithm called HDRnet, a deep neural network that predicts, from a linear image, per-tile curves that approximate the HDR+ look of that image. It's also fast, due to its compact architecture and the way that low-resolution input images can be used to predict the curves for the high-resolution viewfinder. We train HDRnet on thousands of images to ensure it works well on all kinds of scenes.
 |
| HDRnet vs. HDR+ on a challenging scene with extreme brights and darks. The results are very similar at viewfinder resolution. Photo courtesy of Nicholas Wilson. |
HDR+ is designed to produce pleasing HDR images automatically, without the need for manual controls or post-processing. But sometimes the HDR+ rendition may not match the photographer’s artistic vision. While image editing tools are a partial remedy, HDR images can be challenging to edit, because some decisions are effectively baked into the final JPG. To maximize latitude for editing, it’s possible to save RAW images for each shot (an option in the app). However, this process takes the photographer out of the moment and requires expertise with RAW editing tools as well as additional storage.
Another approach to artistic control is to provide it live in the viewfinder. Many photographers are familiar with the exposure compensation slider, which brightens or darkens the image. But overall brightness is not expressive enough for HDR photography. At a minimum two controls are needed in order to control the highlights and shadows separately.
To address this, we introduce dual exposure controls. When the user taps on the Live HDR+ viewfinder, two sliders appear. The "Brightness" slider works like traditional exposure compensation, changing the overall exposure. This slider is used to recover more detail in bright skies, or intentionally blow out the background and make the subject more visible. The "Shadows" slider affects only dark areas — it operates by changing the tone mapping, not the exposure. This slider is most useful for high-contrast scenes, letting the user boost shadows to reveal details, or suppress them to create a silhouette.

 |
| Screen capture of dual exposure controls in action on an outdoor HDR scene with HDR+ results below. You can see individual images here. Photos courtesy of Florian Kainz. |
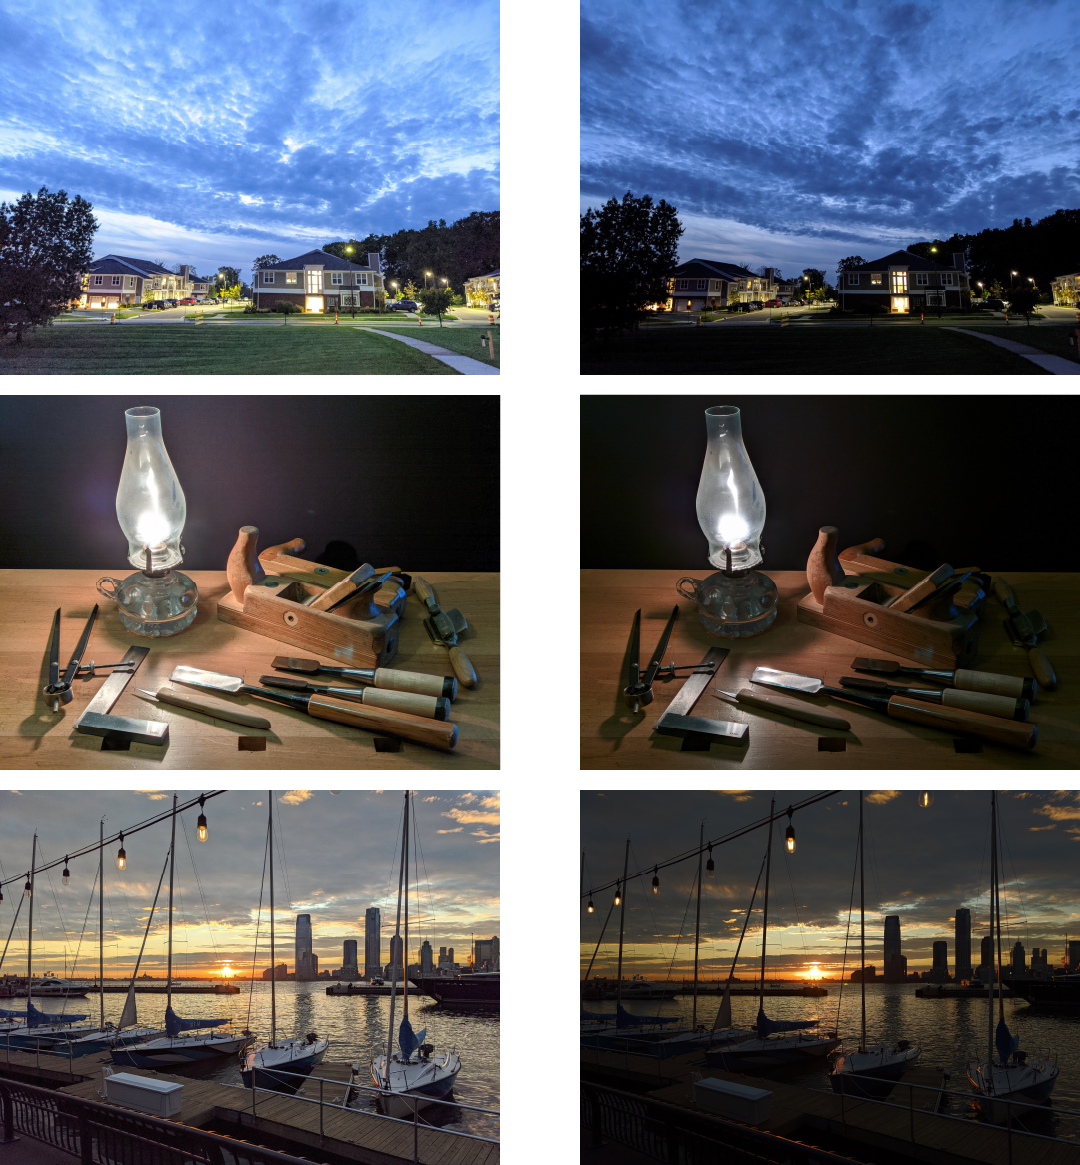 |
| Different renditions using Dual Exposure Controls. You can see individual images here. Photo credits: Jiawen Chen, Florian Kainz, Alexander Schiffhauer. |
Acknowledgements
Live HDR+ and Dual Exposure Controls is the result of a collaboration between Google Research, Android, Hardware, and UX Design teams. Key contributors include: Francois Bleibel, Sean Callanan, Yulun Chang, Eric Chen, Michelle Chen, Kourosh Derakshan, Ryan Geiss, Zhijun He, Joy Hsu, Liz Koh, Marc Levoy, Chia-Kai Liang, Diane Liang, Timothy Lin, Gaurav Malik, Hossein Mohtasham, Nandini Mukherjee, Sushil Nath, Gabriel Nava, Karl Rasche, YiChang Shih, Daniel Solomon, Gary Sun, Kelly Tsai, Sung-fang Tsai, Ted Tsai, Ruben Velarde, Lida Wang, Tianfan Xue, Junlan Yang.
-
Labels:
- Machine Intelligence
- Photography
- Product
Other posts of interest
-
April 12, 2024
Contrastive neural audio separation- Machine Intelligence ·
- Sound & Accoustics
-
April 11, 2024
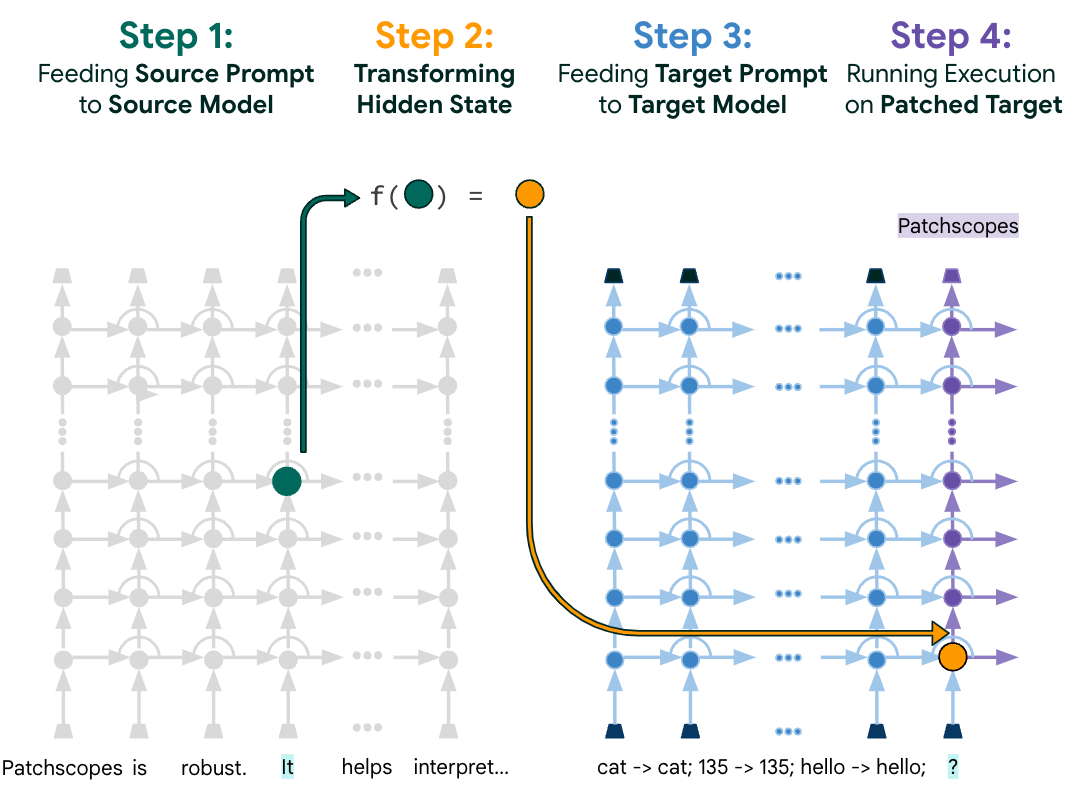
Patchscopes: A unifying framework for inspecting hidden representations of language models- Machine Intelligence ·
- Natural Language Processing ·
- Responsible AI
-
March 28, 2024
AutoBNN: Probabilistic time series forecasting with compositional bayesian neural networks- Algorithms & Theory ·
- Machine Intelligence ·
- Open Source Models & Datasets